Show Desktop on Windows 11

After bringing back the quick lunch taskbar in Windows 11, after an update my Show Desktop shortcut vanished. I know there is the same functionality in the bottom right corner but after so many years I want it where it was!

So the solution? Right click on Desktop > Create shortcut > (paste) %windir%\explorer.exe shell:::{3080F90D-D7AD-11D9-BD98-0000947B0257} > (type) Show Desktop > Next and done! Right click on the shortcut and change icon!

After that move the shortcut in the quick lunch folder!


How to Enable the Quick Launch Bar in Windows 7 and 11

Windows 11 update!

Before you follow the steps below make sure you download ExplorerPatcher

This will give you the beloved windows 7/8/10 taskbar

Here is what to do to enable the Quick Launch Bar.

  1. Right-click on the Taskbar and select Toolbars > New Toolbar from the menu.
  2. Copy and paste the address provided below into the Address bar ‘%SystemDrive%\Users\%username%\AppData\Roaming\Microsoft\Internet Explorer\‘ then click the arrow to the right of the Address bar to navigate to the folder.
  3. Select the Quick Launch folder listed and click the Select Folder button.
  4. Right click on the toolbar and uncheck “Show Text” and Show Title”
  5. Drag the toobar where ever you want.

Nextcloud @ Debian 10

On a clean Debian 10 install type the following

apt-get install apache2 mariadb-server libapache2-mod-php7.2
apt-get install php7.2-gd php7.2-json php7.2-mysql php7.2-curl php7.2-mbstring
apt-get install php7.2-intl php-imagick php7.2-xml php7.2-zip

download the latest versnion from https://nextcloud.com/install/#instructions-server for example:

wget https://download.nextcloud.com/server/releases/nextcloud-17.0.1.tar.bz2

after just decompress the file

tar -xjf nextcloud-17.0.1.tar.bz2

Then copy the installation files to the root of the webserver

cp -r nextcloud /var/www

Please note when you are running the Apache HTTP server you may safely install Nextcloud in your Apache document root!

Give read/write access to web server on the new folder

chown -R www-data:www-data /var/www/nextcloud/

create a configuration file for nextcloud in Apache

pico /etc/apache2/sites-available/nextcloud.conf

with the following content

Alias /nextcloud "/var/www/nextcloud/"

<Directory /var/www/nextcloud/>
  Require all granted
  Options FollowSymlinks MultiViews
  AllowOverride All

 <IfModule mod_dav.c>
  Dav off
 </IfModule>

 SetEnv HOME /var/www/nextcloud
 SetEnv HTTP_HOME /var/www/nextcloud

</Directory>

enable it by issuing

a2ensite nextcloud.conf

enable some needed modules

a2enmod rewrite
a2enmod headers
a2enmod env 
a2enmod dir 
a2enmod mime 

and do not forget to restart Apache

systemctl reload apache2

Now before we go ahead lets prepare MariaDB

systemctl start mariadb
mysql_secure_installation

and after that

mysql
MariaDB> use mysql;
MariaDB> update user set plugin='' where User='root';
MariaDB> flush privileges;
MariaDB> quit

Now you can login to mysql only with the -p option and the password you setup in the previous step. I strongly suggest to setup a user for nextcloud database. Do not use root to create the database.

mysql -u root -p 
CREATE USER 'next'@'localhost' IDENTIFIED BY 'YourPassword';
CREATE DATABASE nextcloud;
GRANT ALL ON press.* TO next@localhost; FLUSH PRIVILEGES; exit;

After that you are pretty much ready to go. Head to the http://IP/nextcloud and follow the steps.

An optional but important step (which I strongly advice to follow is to enable https by default. This will encrypt the communication. To do that we will use Let’sEncrypt.

a2enmod rewrite ssl
nano /etc/apache2/sites-available/default-ssl.conf
 SSLProtocol all -SSLv2 -SSLv3
 Add SSL Cipher in one long line
 SSLCipherSuite          ECDHE-RSA-AES128-GCM-SHA256:ECDHE-ECDSA-AES128-GCM-SHA256:ECDHE-RSA-AES256-GCM-SHA384:ECDHE-ECDSA-AES256-GCM-SHA384:DHE-RSA-AES128-GCM-SHA256:DHE-DSS-AES128-GCM-SHA256:kEDH+AESGCM:ECDHE-RSA-AES128-SHA256:ECDHE-ECDSA-AES128-SHA256:ECDHE-RSA-AES128-SHA:ECDHE-ECDSA-AES128-SHA:ECDHE-RSA-AES256-SHA384:ECDHE-ECDSA-AES256-SHA384:ECDHE-RSA-AES256-SHA:ECDHE-ECDSA-AES256-SHA:DHE-RSA-AES128-SHA256:DHE-RSA-AES128-SHA:DHE-DSS-AES128-SHA256:DHE-RSA-AES256-SHA256:DHE-DSS-AES256-SHA:DHE-RSA-AES256-SHA:AES128-GCM-SHA256:AES256-GCM-SHA384:AES128-SHA256:AES256-SHA256:AES128-SHA:AES256-SHA:AES:CAMELLIA:DES-CBC3-SHA:!aNULL:!eNULL:!EXPORT:!DES:!RC4:!MD5:!PSK:!aECDH:!EDH-DSS-DES-CBC3-SHA:!EDH-RSA-DES-CBC3-SHA:!KRB5-DES-CBC3-SHA
 SSLHonorCipherOrder     on
 SSLOptions +StrictRequire
 Header always set Strict-Transport-Security "max-age=63072000; includeSubdomains"
 Header always set X-Frame-Options DENY
 Header always set X-Content-Type-Options nosniff

This will enable ssl on Apache and then you have to add the ciphers to support along with some more security enhancements

Install the certbot. It will do most of the job for you.

apt-get -y install certbot
apt-get -y install python-certbot-apache
certbot --authenticator webroot --installer apache

 crontab -e
 0 2 * * * certbot renew >> /var/log/letsencrypt.log

That’s it! You are done.
 

Transfer WhatsApp (and other data) from iPhone to Android

After a long time with Apple iPhone and because the last update of IOS 11 made my iPhone 5s really sluggish I decided to abandon Apple’s ecosystem once more and try Android again.

So I got a nice new Xiaomi Redmi 4X with 4GB RAM and 64GB ROM! Nice, cheap and fast.

The issue is that moving from one platform to another is not as straightforward as it sounds. Especially for apps which are not entirely cloud based.

One of the most important apps that I use daily (and a lot of people do also) is Whatsapp! If you do not know it you leave in another planet!

WhatsApp has a built in feature to back up locally or cloud (icloud or google drive respectively) BUT the backup cannot be transferred from one platform to another!

If you Google the solution there a lot of guides they claim you can do it. Most of them are just promoting software. Quite expensive for the task in my opinion.

So what is the solution? You need one application to your PC/MAC and one app on your Android. The first is free and it is called iPhone Backup Viewer (it is free when your iPhone backup is not encrypted).

The second is an app you can find in Play store. It is called WazzapMigrator and I think it worth its cost. The only issue I found it is the instructions. They are all over the place and do not follow the logical flow but it is all there!

So what are the steps?

  1. Backup you iPhone with iTunes on you PC or MAC. DO NOT encrypt the backup! (*)
  2. Download and run iPhone Backup Viewer. It will find your backup automatically.
  3. Follow those instructions to find your WhatsApp messages and media files and store them on your PC/MAC.
  4. Go to your Android install WazzapMigrator and run it once. Install WhatsApp but do NOT run it yet.
  5. Connect your Android to your PC/MAC. Go to internal storage of your device. You should see a WazzapMigrator folder. IF not then restart your Android device. You will be able to see it.
  6. Copy the messages (ChatStorage.sqlite) and media to WazzapMigrator folder. Run WazzapMigrator. It should find messages and media and convert them. Allow it to move it to WhatsApp folder.
  7. Run WhatsApp. It should find the backup and restore it.
  8. That’s it!

It took me more time to find the solution than actually transfer the files and do the migration.


(*) I suppose you already know how to move the rest of the data from your iPhone to Android.

Do not forget before you wipe your iPhone to deregister from imessages/facetime and unpair with your Apple Watch.

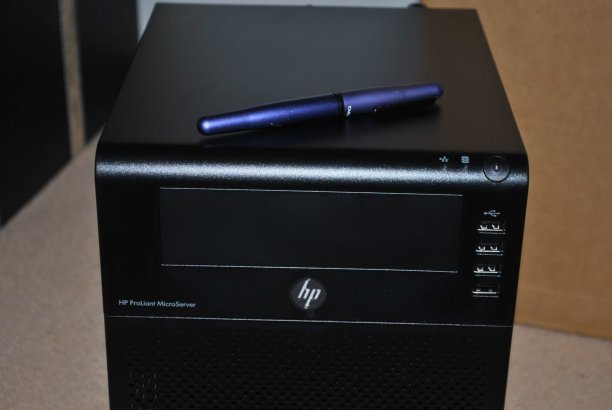
HP ProLiant MicroServer N40L + OpenMediaVault

Αγορασα χθες το HP ProLiant N40L MicroServer . Ειναι ενα καταπληκτικο και αθορυβο μηχανακι. Απο οτι καταλαβα ειναι πολυ διαδεδομενο εδω στο UK.  Ηθελα ενα μικρο NAS μετα το τελευταιο ατυχημα με τους δισκους κυριως για τις photo της οικογενιας που πλεον εχουν φτασει τα 48GB.
Κατεληξα σε αυτο οταν το ειδα στο http://www.hotukdeals.com/. Το κοστος του ειναι 239 λιρες – 10 λιρες εκπτωση – 100 λιρες cashback απο την HP – 3 λιρες topcashback.co.uk = 126 λιρες! Πολυ καλη τιμη. Απο dabs.com .

Τα χαρακτηριστικα του
Processor:
AMD Turion™ II Neo N40L (1.5GHz)
AMD RS785E/SB820M chipset
Memory:
Two (2) DIMM slots
2GB (1x2GB) Standard or 4GB (1x4GB)/8GB Maximum, using PC3-10600E DDR3 Unbuffered (UDIMM) ECC memory, operating at max. 800MHz
Storage Controller:
Embedded AMD SATA controller with RAID 0, 1
Embedded AMD eSATA controller for connecting external storage devices via the eSATA connector in the rear of the server
Internal Drive Support:
4 Internal HDD Support
Maximum internal SATA storage capacity of up to 8.0TB (4 x 2TB 3.5″ SATA drives)
Network Controller:
Embedded NC107i PCI Express Gigabit Ethernet Server Adapter
Expansion Slots:

Slot 1: PCI-Express Gen 2 x16 connector with x16 link
Slot 2: PCI-Express Gen 2 x1 connector with x1 Link
Slot 2-2: PCI-Express x4 slot for optional management card

USB 2.0 Ports:
Seven (7) USB 2.0 ports: 4 front , 2 rear, 1 internal (for tape)
Power Supply:
150 Watts Non-Hot Plug, Non Redundant Power Supply

Δυστηχως οι τιμες των σκληρων ειναι ακομα πολυ ηψηλες και προς το παρων δε θα το γεμισω. Οταν πεσουν θα βαλω 4 χ 2 TB. Για τα data + 250gb για το λειτουργικο.

Αποφασισα να βαλω το OpenMediaVault http://www.openmediavault.org/
Καταπληκτικο! Debian based. Αφηνει πισω του freeNAS και αλλα πολλα. Ισως το βαλω να τρεχει απο usb stick…

Την μονη αλλαγη που εκανα ειναι να βαλω τον δισκο που ερχετε στο Optical Bay (χρειαστηκε ενα sata καλωδιο και ενα molex + sata power) ωστε να ειναι ελευθερα τα 4 SATA bay για δισκους.


Format… and now what?

I admit it. I am not a fan of format. I like my system as it is. After almost 4 years I had to format my workstation. Since I had to do it I installed a Crucial m4 SSD which was sitting on my desk for some time. Windows 7 Ultimate installed in no time thanks to Windows 7 USB/DVD download tool.

And now what? It is really boring and time consuming to reinstall all the nice tools I use daily.

OK I have installed too many applications and a clean up it is nice. I found this incredible nice tool called Ninite ! It is amazing!

It includes most of the applications I really need in daily basis and with just one click I was able to install them. Latest version too!

Fantastic! Saved a lot of time.  Give it a try!


Resize and Expand Disk Partitions in Vmware / Vsphere ESX

We all have come accross the problem that we run out of space on the main/boot partition of a virtual machine.

Well if you work with Vmware ESX or ESX(i) then you are very lucky. You can very easy resize the hard disk.

Switch off the VM go to Edit Settings and just add more space to the disk. Case solved? No yet!

You now have a bigger disk but the partion is still the same.

If it is a logical disk or any data disk then what you need is diskpart but if your disk is the boot disk the diskpart does not work.

What you need is a third party software to expand the partition and what better than an opensource solution.

Gparted is the name of the tool I used. You can download the live CD iso and boot from there..in minutes you can resize the partition!

It worked perfect on an Microsoft Windows 2003 R2 server who run out of space on C:

I have not tried it yet on a physical server but the procedure is the same, it will just take some more time.

Ofcourse there are a lot of other utilities for resizing and expanding a partition out there.

Bittornado does not allow files that starts with a dot to be downloaded

The error

error: got bad file info – path .message disallowed for security reasons

The problem

The problem is BitTornado specific. I use Torrentflux which uses BitTornado client.
Bittornado does not allow files that starts with a dot to be downloaded. It was designed for security in Windows versions. I use Linux and so it is not so much of a problem.

The solution

Edit the /BitTornado/BT1/btformats.py file (usually it resides under your flux directory)
Locate reg = compile(r’^[^/\\.~][^/\\]*$’)
and changed to reg = compile(r’^[^/\\~][^/\\]*$’)
The dot was removed.

Case closed